Morel Cultivation
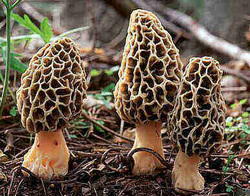
Cultivating Morel Mushrooms: Ronald D. Ower was the first person's name to pop up when I began asking about Morel's, Ronald Ower was the first person to document there success in cultivating the "elusive" Morchella or Morel mushroom, publishing in an 80's paper that he had "coaxed morels to fruit in his laboratory". Unfortunately, Upon awaiting his approval on the patients of his success (Patient Pending) he was murdered in San Francisco and never saw his method fully patented. Gary Mills has since taken over the studies and published multiple papers, claiming that he first "had to learn how to think like a mushroom", and through trial and error, Gary Mills developed a substantial formula for cultivating the Morel Mushroom along with the ability to replicate it's habitat.
Gary Mills gives a small detailed description on his process. You can download it here
As of 2011, there are quite a few patients and publications on variables of the original patent.
Terri Marie Beauséjour, has also released a small publication on cultivating morels: You can download it here.
Terry Farms purchased the patents originally held by Neogen in 1994 and, in 2005, Diversified Natural Products began producing morels in Michigan using the patents. Terry Farms opened a morel production facility in Auburn, Alabama and offered their products for a few years, but eventually closed down the operation. Probably due to low marginal profits.
In 2005, Stewart C. Miller patented a process for growing morels that involves inoculating tree seedlings with morel mycelium, allowing the mycelium to grow, then killing the seedlings to induce the morels to fruit.
Recently, In 2010, Segula Masaphy at Migal - Galilee Technology Center, a subsidiary of the Galilee Development Company in Israel, reported success cultivating Morchella rufobrunnea. His paper is entitled "Biotechnology of morel mushrooms: successful fruiting body formation and development in a soilless system". You can download the publication here
Harvesting Wild Yeast
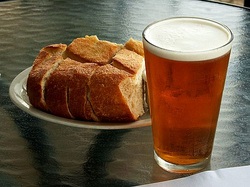
To start a culture, mix two cups of flour and two cups of water (use distilled water or let the water sit over-night to disperse any chlorine) in a glass or pottery bowl (in the old days, a baker probably had a special clay crock for starter). Lay a cloth over the top and let it sit on the kitchen counter. It turns out that there is yeast floating in the air all around us all the time, and some of this yeast will make its way to your flour/water mixture. It will then start growing and dividing. After 24 hours, you pour off about a cup of the mixture and feed it with another cup of flour and another cup of water. In a few days, the mixture will become frothy as the yeast population grows. The froth is caused by the carbon dioxide that the yeast is generating. The starter will also have a bacteria (lactobacilli) in it. This lends to the slightly acidic flavor of the bread by creating lactic acid! The alcohol that the yeast creates and the lactic acid together are the source of sourdough bread's unique flavor!
Let the starter sit for five days. As the starter ferments, it begins to develope a strong aroma (like bread and alcohol...not very pleasant). Feed it every day or two by dividing it in half and adding a cup of flour and a cup of water to one half of it (you can throw the other half away). When you see a watery substance floating to the top, stir it. Sourdough bakers call this "hooch." Over the week the starter became a thick liquid, like pancake batter. It will be slightly yellowish.
At this point you can do one of two things:
- You can store it in the refrigerator to slow down the yeast. Then you will only have to feed it every 5 or 6 days.
- Or keep it on the counter and feed it every day.
Making Extracts from Glycerite
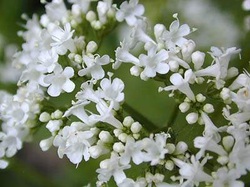
Making a Glycerite is the process of extracting plant nutrients using vegetable glycerin. Making Glycerite is a safe alternative to the popular alcohol and vinger methods. Methods vary quite a bit so don't be afraid to experiment with it.
Start by filling half a jar with your favorite herbs. Add just enough hot water to get the herbs wet and fill the jar to about 1/2 inch from the top with glycerine. After closing the jar tightly, place it in a crock-pot with a small towel underneath to keep the jar from breaking. Fill the crock-pot with water up to the top of the jar (not touching the lid), and leave it on the lowest setting for 3 days, keeping the glycerine hot but not boiling, and add water as necessary. After about 3 days, carefully strain the hot and sticky herbal mixture through a cheesecloth into a glass container. Squeeze the herbs a bit, pour a small amount of boiling water over them, and then discard them. Close tightly and label the glycerite tincture. We have kept and used our tinctures for several years.
By the way, if your crock-pot gets too hot on the lowest setting, the herbs will smell like they are cooking and turn dark and strong smelling within 24 hours. This will not ruin the glycerite, but it does speed up the process and may not be quite as effective as a slow heat. We have a crock-pot that gets too hot, so after about 42 hours, we go ahead and strained the mixture, and it is just fine. You can also water bathe the herb/glycerine mixture by placing the closed jar in hot water on the stove for 3 days. The idea is to break down the herbs so that the properties are released into the glycerine. You have succeeded when the mixture becomes dark and strong smelling.
